


安全・安心なお支払いを保証


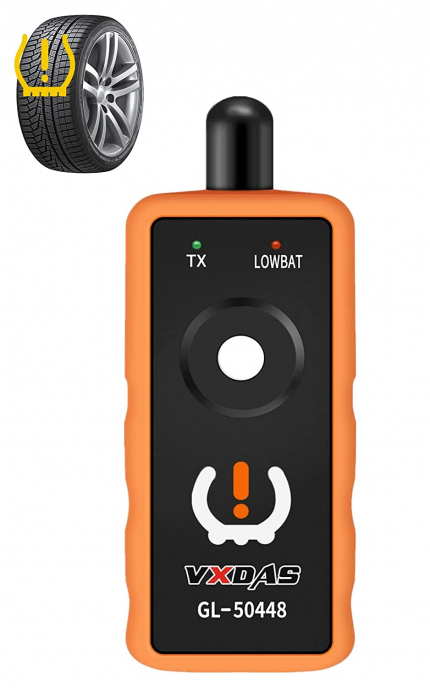
The VXDAS EL50448 TPMS Reset Tool is designed to service the Tire Pressure Monitoring System (TPMS) on GM/Opel series vehicles. It facilitates sensor reactivation and relearn procedures after sensor replacement or tire rotation.
EL-50448 TPMS Reset Tool Description:
【Note: Please check your car model whether it can work with EL-50448 in the last pictures,Not for TRUCK & Please use NEW 9V battery】TPMS tire pressure sensor on models in & after 2012 can be read, only with some specified diagnostic tools.
EL-50448 tpms reset tool can help you reprogram all tires much easier just with 3 steps.
Ensure that the vehicle is in the TPMS Learn Mode, and follow the service procedure. Hold tool against the sidewall of the tire, near the valve stem. Depress Learn button while holding the tool against the tire sidewall.
Tire pressure monitor sensor activation tool is simple, fast and easy to use, activates the individual TPM sensor with the press of one button.
【Different vehicle may need different times to reset all of your tire sensors after rotation】TPMS reset tire pressure monitor sensor tool for G-M Series Vehicle for 2010-2013, package does not include the charger and battery.

When you need EL-50448 VXDAS TPMS Reset Tool:
1. After New TPMS sensors installed,let air out or add air into the tire but couldn’t make the system recognize new sensors.
2. Do tire rotation but don’t have a quick and easy way to let ECU relearn new tire information.
3. Low tire pressure or leakage /replacement or installation of tire pressure monitoring equipment / tire replacement, sensor damage, etc. After those problems solved, TPMS needs to be reset.
4.When tire pressure indicator light ON, the maintenance performed, the tire pressure needs to be reset to turn off the TPMS light.

EL-50448 VXDAS TPMS Reset Tool Functions:
EL-50448 TPMS Relearn Tool
For GM series vehicles equipped with a 315MHz or 433 MHz tire pressure monitoring system, a “sensor relearn procedure” must be performed after tire rotations, remote control door lock receiver module replacement or tire pressure sensor replacement. This relearn procedure can be performed by using special tool EL-50448.
GM TPMS Reset Tool
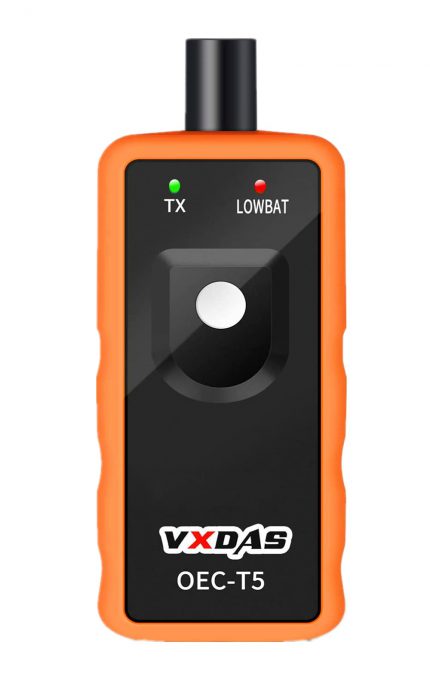
EL-50448 Orange OEC-T5 can help you reprogram your tire pressure easily within just 3 steps. This TPM relearn reset tool is easy to activate the individual TPM sensor with only pressing one button.
TPMS Sensor Activation Tool
EL-50448 works on all General Motors products (Buick, Cadillac, GMC) that have TPMS sensors. Please check whether EL-50448 is available for your car, see the last picture.

VXDAS EL-50448 Tire Pressure TPMS Relearn Tool EL50448 for G-M Tire Pressure Sensors Activation Reset Tool
Most of G.M vehicles are equipped with a 315 or 433 MHz (TPMS) Tire Pressure Monitoring system, a “Sensor Re-Learn Procedure” must be performed after tire rotations, remote Control Door Lock Receiver Module replacement or Tire Pressure Sensor replacement.
This re-learn procedure can be performed by using EL-50448 special tire pressure tool.
How to use:
1. Make the gear in P position.
2. Use cruise to choose TPMS re-learn mode in the dashboard settings.
3. Horn will ring twice and the TPMS indicator flashes, then the learning mode has been successfully entered. If equipped, the message center will display the front left (LF) tire.
EL-50448 VXDAS TPMS Reset Tool Support Models:
Factory tested models:
2006-2019 For almost all GM Series vehicles: Buick, Cadillac, Chevy, GMC, Opel
2010: Acadia, Enclave. OUTLOOK, Traverse (VIN R/V) ,Allure, LaCrosse (VIN G),Antara. Captiva, Terrain, Winstorm, Avalanche. Escalade, Suburban, etc.
2011: Astra,Avalanche. Escalade, Suburban, Tahoe, Yukon (VIN C/K),Aveo, Barina (VIN S/T),Buick Excelle,Buick Regal (China),Camaro (VIN F),Canyon, etc.
2012: Camaro (VIN F),Canyon, Colorado (VIN S/T),Caprice PPV,Captiva Sport,Chevrolet Cobalt (2809),Colorado (Other IO), S10 (South America),Corvette.etc.
2013: Barina (5376837),Camaro (VIN F) (3106), Caprice PPV (3105),Captiva Sport (3101),Cobalt (3107),Colorado, Colorado 7, S10, Trailblazer (5392270),Combo-D,Corvette (VIN Y) (3104).etc.
Customer test available models:
2006-2013: Corvette,Nissan Frontier,Cadillac Escalade,GMC Yukon Denali,NBS. etc
2014-2015: Buick Lacrosse,Chevy Volt,Chevy SS.Chevy Cruze,Chevy Equinox,Chevy Silverado. etc
2016-2018: Acadia,Buick,Buick cascada,Chevy lahoe,Chevy Cruze,Chevy equniox,Chevy Colorado.etc

VXDAS EL-50448 TPMS Tool Specification:
Hardware Version: OEC-T5
Software Version: EL-50448
External Testing Certification: CE
Material Type: High quality plastic & metal
VXDAS Tips For Operating VXDAS EL-50448 TPMS Tool
The tire pressure sensor on models in and after 2012 can be read, only with some specified diagnostic tools.
Before tire pressure monitoring system works normally properly, the body control module will record ID information of each position in the tire pressure sensor.
After replacing a tire or wheel speed sensor, you can use the follow methods to read the tire pressure sensor:
Step 1 – Enter leaning mode
Set gearshift lever to P
Put ignition switch to ON
Enter DIC & Press “Set / Ctrl”
The turn signal is lighted for 3 Sec and the horn beep sound twice to enter the learning mode
Step 2 – Read tire pressure sensor information
Start from the front-left wheel
Use EL-50448 antenna up against the valve core position
Near the rim of the tire sidewall
Final read info when horn bleep
Step 3 – Same method to read other tire pressure information
Follow the step to read information of other wheels.
Turn signal lights for 3 Sec and horn bleeps twice when the learning is complete.
Packing List:
1X EL-50448 TPMS Relearn Tool
Related FAQs:
Q1: Which GM automobiles will EL-50448 TPMS work on?
A1: Only GM vehicles around 2003 to present.
Q2: Will it work on a ford expedition xlt 2006?
A2: No, this is for General Motors vehicles only.
Q3: Will this el-50448 tpms work on 2014 Hyundai vehicles?
A3: No just GM.

返金保証
当社の設備に絶対の信頼をおいてご投資ください。満足度保証がそれを支えます。

1年間保証
当社の専任チームが迅速なサポートを提供し、お客様からのお問い合わせにお応えいたします。

カスタマーサービス
当社の専任チームが迅速なサポートを提供し、お客様からのお問い合わせにお応えいたします。


Daniel (承認) –
Works for 2009 Chevrolet HHR
I bought this to relearn the TPMS valves when I rotated the tires on my 2009 Chevrolet HHR. The tool does work and is easy to use. It would not work on one of the rear wheels. It may be that I was using an older battery. This requires a 9-volt battery which is not included. I did have to use the alternate method that I learned which is FREE and does not require the use of a relearning tool like this. Try it and see if it works for you. It worked for me. 1. Turn ignition to ON position 2. Scroll DIC (Driver Information Center) to the tire pressure selection. 3. Press and hold both the lock/unlock on your key fob until the horn beeps and you see the tire pressure zero-out. (You may see just dashed instead of numbers when it does this) 4. Exit the vehicle leaving the ignition ON and go to the wheel where the corner marker light it lit. Probably the left front to start. 5. Remove the valve cap and let some air out of the tire using the valve. It should only take a small amount of air for the system to recognize which tire is being relearned. The horn will BEEP when it is learned and the system will light the next corner light until all TPMS valves have had their positions learned. 6. Adjust air pressure in all four tires to recommended pressures found in the frame of the driver’s door.
Charlie Tuna (承認) –
Take that Government Motors!
Remember when you could relearn the tire sensors with nothing more that the DIC and a user’s manual? Well, apparently GM decided that was too much freedom for the owner of one of their vehicles so what was their solution? Make it so the dealer would have to be consulted- and quite possibly for a fee. Well, my troubles are over! I used this on a 2012 Chevrolet Traverse LTZ and following the user’s manual, the horn beeped at the appropriate times and the tires were sensing in the proper position (as tested by releasing air to see a visible change in the DIC). This may seem trivial- until you have a small non visible leak on a tire and right front is actually left rear! This was my procedure for those who want to know, and as outlined by the user’s manual starting on page 10-46. 1. Set the parking brake. 2. Turn the ignition to the ON/RUN position with the engine off (the second click before the cranking spot but one click after the acc). 3. Press the Remote Keyless Entry (your key Fob) Transmitter’s LOCK and UNLOCK simultaneously for about five seconds. The horn will beep twice to signal the receiver is in relearn mode and TIRE LEARNING ACTIVE will be displayed on the DIC. 4. Start with the driver side front tire. 5. Place the relearn tool against the tire sidewall, near the valve stem. Then press the button of your very handy dandy VXDAS EL-50448 (after you install a 9 volt battery of course) to activate the TPMS sensor. A horn beep confirms the sensor ID code has been matched to the tire and wheel position. 6. Proceed to the passenger side front tire and repeat the procedure in step 5. 7. Proceed to the passenger side rear tire and repeat the procedure in step 5. 8. Proceed to the driver side rear tire and repeat the procedure in step 5. The horn will beep two times to indicate the sensor ID code has been matched to the driver side rear tire and the TPMS sensor matching process is no longer active. The TIRE LEARNING ACTIVE message on the DIC goes off. 9. Turn the ignition to LOCK/OFF. 10. Set all four tires to the recommended air pressure levels as indicated on the Tire and Loading Information label. 11. Enjoy your liberation from the GM stealership!
Ryan M. (承認) –
Works on 2016 Silverado!!!
I have a 2016 Silverado, and do my own maintenance. After realizing that I can’t use the keyless remote to reset the TPMS after a tire rotation, I bought this. All I had to do was go to my tire pressure screen on the dash, and hold the "check" button down for about 10 seconds to enter programming mode, then got to each tire with this device, hold the button down until the horn honks, then proceed to the next wheel. It worked perfectly.
Robert E Bennett (承認) –
2015 Buick Enclave with TPMS monitoring system
I rotated the tires on my wife’s 2015 Buick Enclave before I thought about how that would impact the tire pressure monitoring system on the vehicle. I ordered this tool to get their location right again. It worked perfectly after installing a 9 volt battery that does not come with it. I followed the instructions in the owners manual to get into the TPMS setup mode and held the tool against the tire near the valve stem like it said. Press the button/release and the horn beeps once to let you know it reset the location of each wheel. Nothing to it.
Budstr8 (承認) –
Awesome product!
Purchased new tires for my 2015 Chevrolet 2500hd and had to reprogram the TPMS. This tool was cheaper than having the dealer do it for me, and only took about 2 mins to complete the task. I would highly recommend this tool for anyone that needs to reprogram TPMS.
Miles (承認) –
Works for 2017 Chevy Silverado 1500
Worked as it was supposed to even though the compatibility list didn’t show any options for a 2017 Chevy silverado 1500 but once I cross referenced the frequency of the tpms sensor it said it would work and it did. Had the new tires matched up in about 2 minutes. Also It requires a 9 volt battery which Is not included.
Kurtis L. Cardwell (承認) –
Easy and inexpensive
Simple, straightforward, easy. It took longer for me to find a 9 volt battery than to completely relearn the four new sensors on our winter tires. We have a 2016 Buick. Literally 1 minute. Simple and easy to follow instructions. Place your car in learning mode from the DIC on the steering wheel, walk around the car, pressing the button at each valve stem. Done! Fantastic and well worth it compared to the nonsense you must go through on foreign cars.
Primus (承認) –
Piece of cake!
I own a 2016 GMC Canyon. I change to winter tires and back each year and hate going to the dealership or a tire store in order to change the tires. At this price I had to order this tool from Amazon. Between the time I hit the reset button on my steering column and used this tool on all four tires, it took me maybe 40 seconds. Worked flawlessly!
R. Graban (承認) –
Works for 2017 Volt; Must hold near tire sidewall, not wheel
Works on my 2017 Chevy Volt; however, NOTE CAREFULLY – I had already submitted a return request, thinking it didn’t work; even after following directions how to get to the tire pressure sensor (TPS) reset / match screen on the vehicle. What you need to do is hold the tool NEXT TO THE TIRE SIDEWALL near the valve stem while pressing the button while in the vehicle’s TPS learn mode. I had been holding it next to the valve stem on the aluminum wheel and it didn’t pick up. Instructions could perhaps be more clear. Very good price compared to official GM tools source – picture is identical with EL-50448 identifier, except the brand name at 3 times the price through Kent Moore.
Eddie 70 (承認) –
Works with my 2014 Chevy Silverado
Works perfectly with my 2014 Silverado. Just turn the key on, go to the screen with the tire pressures and hold the check mark button down for about 5 seconds and the truck goes in learn mode. Go to each tire stem, starting at the drivers side front and hold the tool to the stem with the white button pushed. The truck will honk once when it has learned the wheel in that position. Move to the next wheel around the truck till finished. Works great.
Daily Account (承認) –
Worked perfect to register TPMS sensors on my 2009 Corvette
I’m currently living in Europe, and shipped my car over, as well, only to have one of my TPMS sensors malfunction. I ordered a replacement, and had a local garage install it. Unfortunately, they didn’t have the tool to register the sensors. This little tool worked perfect to register my tire sensors on my 2009 C6 Corvette. FYI, I’m using sensor number ACDelco 25758220 (the grey sensors).
CC (承認) –
worked on Nissan frontier
Worked great the first time on a 2006 Nissan Frontier , put vehicle in relearning mode by grounding the connector 6 times then just go in a clockwise direction starting at the driver side front tire …the lights flash when the sensor transmits done in less than 5 minutes …can be done without this tool but involves changing pressures and driving around this tool makes the process much easier and less expensive than the $75 the tire shop wanted to perform this same procedure
Bubba Johnson (承認) –
Works with 2016 Terrain
When I was looking for one of these I could not find any RECENT information indicating what device was needed for the 2016 model year. I eventually found a GMC Sierra user group that indicated that the EL50448 design (sold under several different brand names) worked on the 2016 Sierra so I took a chance that it would also work on a Terrain. It does. Super simple to use. Reprogrammed the 4 tires in 30 seconds.
k4rynbr1 (承認) –
Works great on my 2008 and my 2014 GM vehicles, even with aftermarket TPMS replacement sensors installed in the 2008
Simple to use, and it works. I used it on my 2014 Chevrolet Traverse, then tried it on my 2008 Chevrolet Impala which even has some aftermarket TPMS replacement sensors installed. Works as advertised, once you have done it once/know what you are doing, takes less than a minute to do your vehicle.
JEM (承認) –
Works Perfectly on 2015 Tahoe but Antenna Position Is Critical
This tool worked perfectly on my 2015 Chevy Tahoe after finding the sweet spot for the antenna. I first tried placing the end of antenna next to the top of the valve stem but it could not communicate with the TPMS. Next I tried placing the end of the antenna on the rim at the base of the valve stem…still no go. Finally, I placed the end of the antenna on the rubber tire at the edge of the rim and by the base of the valve stem…this position worked perfectly for all 4 tires (see photos). I am very satisfied with this product.
Jason Hendricks (承認) –
Easy to use Instructions for everyone
Bought this for my 2012 Chevy Suburban with TPMS. Inserted a 9v battery and it works great. Turn key ON and press both Lock and Unlock together and hold on Key Fob, wait for HONK. Go to front Left tire, I put it on the flat of the rim above the valve stem and press button and HOLD, wait for HONK. Go to Front Right tire and repeat, Wait for HONK, next is you guessed it Right Rear tire, rinse and repeat, Wait for HONK, no go to the last tire, left rear if you were not paying attention, and set it. You will now get TWO HONKS. Programming complete. Super easy and convenient if you rotate tires yourself.
Franklin Jim (承認) –
This worked perfectly first time.
This works perfectly. I didn’t pay too much attention to the included instructions and went by the 2017 Caddy CTS owners manual, which itself is a little ambiguous regarding which ignition power mode to use. Just hold down the start/run button (without foot on brake!!) for 5 seconds and allow the vehicle to go into diagnostic power mode, and follow the rest of the CTS manual’s instructions. Literally took about a minute to relearn all 4 corners.
G. Davis (承認) –
Exactly as described for my Chevy
Item worked exactly as described. I had an ses light on my 2010 SS Camaro. I was a little sceptical according to various reviews. I changed a tire out and came home to check pressure in tire and went throught the set/relearn on car and nothing happened and none of my pressures would should up. I researched and found this tool and followed instructions and all four came back on. (This product uses a 9 volt battery, does not come with it) For most GM start with left front and go clockwise around car and listen for car to beep when you hit transmit on each wheel. It fixed my problem and is great for rotations and sensor blips)
Steve Konvalin (承認) –
Must have for my 2011 Camaro.
Saved me a lot of time and money!! Last year I bought new wheels, tires and TPMS monitors for my 2011 Camaro SS. The TPMS sensors were bought off ebay and I felt like they sent me the wrong ones as I could not get them to program manually nor could the tire installer get them to install with their tire monitor. So I drove around with the TPS light on for the last 8 months. I finally was ready to order new sensors and pay $200 for the new install when someone on another website recommended I try this monitor. It was worth the $18 so I thought why not. After getting it and putting a battery in (Which is not included) I went out to the car, followed the procedure in the instructions and 2 minutes later, all sensors programmed and working!! Couldn’t be more happy!!
Will (承認) –
Works perfectly for Chevy Volt 2017
Worked perfectly for Chevy Volt 2017 with original GM TPMS transmitters. Pressing a button is more of “press and hold until you hear car beep”. I was somewhat disappointed that Volt does not have memory for 2 sets of TPMS sensors so each time I replace seasonal tires I have to pair TPMS again. This tools allows me to do pairing myself in less than 2 minutes. Make sure you place tip of stubby antenna against tire position where TPMS transmitter is.
Worldpeece (承認) –
Amazing product- Works as described. 9 Volt battery required (not included)
Excellent product. Worked EXACTLY as described. I run both winter and summer tires and wheels. Now that I bought a GMC, the TPMS system has to reset every single time I change the tires/wheels. Never had this issue with my Acura. While the dealership would reset the TPMS for free, it was a bit of a hassle to drive there and I thought I’d just do it myself. I did some research and saw that this product was well rated and extremely reasonably priced. I wasn’t sure if it would work or not, but decided to give it a shot. I received the product in the mail (2 days…right on time), looked up the instructions in my owners manual and was ready to try it. BUT…the reset requires a 9 volt battery. So, I had to run in the house to grab one. Installed the battery, followed the instructions and voila! I was done in about a minute. I placed the antenna on the sidewall of the tire next to the valve stem. This location works best. Don’t place the antenna directly next to the valve stem, it should be placed on the sidewall just like it states in the directions. So I’m very happy and the product worked exactly as it was supposed to. Very happy with the purchase. The only thing that almost threw me for a loop was that a battery wasn’t included. I didn’t notice if it said anything about a battery not being included in the description or not, but make sure you have a 9 volt battery.
sa418 (承認) –
inexpensive. simple. works
I obsessed trying to research more expensive solutions for my 2018 GMC Sierra. I bought this because for < $20 there wasn’t anything to lose. It worked great even though I didn’t see my vehicle on the certified list. I trained my TPMS in the time it took to open my driver door, put the key in the ignition, select the TPMS screen, and walk around the truck (< 2 minutes). DONE.
POWERPRO (承認) –
As advertised, very handy for switching wheels.
Worked perfectly on my 2013 cadillac Ats. Quality seems good and it is a must have for anyone who has dedicated summer/winter wheels with TPMS. No more needing to go to the dealer. For the cost it is a no brainer,highly recommended. For my vehicle: I just needed to go to the tire psi screen on the center information screen in the Guage cluster and hold the enter button on the steering wheel to initiate the programming. Put the device near each valve stem starting with the drivers side front wheel and going clockwise around the car. Very easy. Feel free to ask any questions. If you found this review helpful please mark it to let me know.
Mr.Pete (承認) –
Waste of money
This worked on my 2008 Nissan Frontier with Alloy wheels. After replacing a sensor I couldn’t get it to wake up. It took several times pressing the white button. Finally the tail lights blinked and the dash light went out. I didn’t have my reading glass so I didn’t read the directions on the back of the tool. I was holding it up against the the valve not the sidewall of the tire.
LoveAmazon! (承認) –
GREAT PRODUCT; WORKS EXACTLY AS IT SHOULD FOR ESCALADE
This monitor worked perfectly on a 2007 Escalade!!! Great product. Took about four minutes to reset all the tire monitors, and they’re working exactly as they should. No inflation/deflation process which didn’t work anyway. The service station switched the codes on two of the tires after an alignment, and the left front tire read was for the right front tire! Thanks, service guy. We then took air out of the wrong tire due to the wrong reading. Great service. We tried using the inflating/deflating method at first. Did not work at all. We lost the codes to all tires and had no codes. Had to go to station to refill air in tires with a air station monitor. Tire pressures were all low after deflating. Talk about angry! I then researched and saw this on Amazon and bought one. IT WORKS GREAT. Reset all codes to all tires, and in the proper order. This is a must have every time you have your tires serviced just in case. Thanks Amazon and seller. What would we do without Amazon to save the day!
WW (承認) –
Works Great on 2016 Chevy Silverado 1500 LTZ! Just follow the lights.
Got the EL-50448 (Orange protective shroud) and it works perfectly on my 2016 Chevy Silverado 1500 LTZ. Antennae placement is key. You don’t need to remember which tire to start with – just remember to follow the lights because the vehicle tells you what tire to visit! Put the key in the "on" position, set the DIC to show the tire pressures, and hold the reset button (right side of steering wheel with the check-mark on it) until you hear a short beep-beep of the horn. Then look for the light. You’ll see that the driver side front turn signal is on, so start with that tire. Put the tip of the antennae on the tire sidewall about an inch away from the rim where the valve stem is. Push the button and wait for the single horn beep. Look for the light. You’ll notice that the passenger side front turn signal is on, so repeat the process with the front passenger tire. Then the passenger brake light…repeat. Then the driver brake light…repeat. Once you do the driver rear tire, you’ll hear a beep-beep which says "you’re done".
alambrose (承認) –
Worked for me with cheap tpms sensors
This worked. I bought 4 tpms sensors for $45 on eBay and installed them on my 2008 Impala. I went through the "tire relearn" procedure, which should have found and assigned the new tpms sensors. But no go, my car wasn’t recognizing the new sensors. Thought maybe I had bought the wrong sensors, or just got ripped off with cheap sub-standard eBay junk. Then I found a blog post where someone stated that the universal sensors sold on eBay typically need to be reset/relearned with a tpms tool. After spending the money and the effort installing these things in my driveway… I was willing to risk the $17 bucks hoping to avoid buying new sensors, and having to remove the "bargain" ones I just bought, only to have to throw them away and do all the work over again to install amore expensive set. Well… every now and then, life throws you a gift! Put my car in tire learn mode, held this tool up to sidewall near the valve, and got the magic horn beep. Walked around the vehicle, did all 4 wheels, and now my cheap eBay sensors are aftive and working as they should. I am a happy camper!
CT (承認) –
Works as advertised (and cheaper than OEM)
I have a 2015 GM vehicle, and needed to have my TPMS reset (after a tire rotation). Since any GM vehicle after 2012 CAN NOT use the tire deflation/inflation trick) I needed a reset tool. Per my owner’s manual, it advised going to a certain GM equipment parts website to obtain the tool (at $60), but this reset tool LOOKS EXACTLY like it (and does both frequencies [315 and 433 MHz]. This unit came in 2 days (thanks Amazon Prime), popped in a (not included) 9v battery, and set off to rest my TPMS. Just follow your owner’s manual procedure (or Google/Youtube it). It read all 4 sensors, and “re-learned” them to the proper new locations. All in about 3 minutes. Sorry if it’s a long review, just wanted to ensure that other wishing to purchase was armed with ground truth. NOTE: THIS ONLY WORKS ON GM CARS.
Brent E. (承認) –
*Updated Review* Didn’t Work
Tool did not work on my 2018 Chevy Silverado 1500. I put vehicle into tire learn mode, placed the tool on the sidewall right next to the TPMS sensor and clicked the button. I tried on every TPMS sensor, tried varying angles, varying spots near the TPMS sensor, still no luck. Quite unfortunate that my return window closed due to my vehicle being in the shop for so long due to a hail storm and now I can’t return it. I would appreciate the seller contacting me to try and remediate this. *****Updated Review from above***** Customer service contacted me and send me the updated version of this tool (see picture). After receiving the new tool, I tried it on my truck and it worked exactly as intended. Grateful for the company working with me and ultimately I got the product I wanted for a good price. Thanks again.
Jodi (承認) –
Instructions a little vague
I spent the first afternoon trying again and again to reset my car’s sensors (2013 Malibu) with no luck. The next day I read a lot of reviews from other vendors. A few mentioned watching a how-to video on Youtube. So I typed in my VDXAS EL-50448. It showed that you point it UNDER the valve stem actually on the tire (just under the rim) and just push the button once (it will transmit for several seconds). So it DOES work! (Point it INTO the tire. The sensor is on the inside end of the valve stem.)
Black Orchid (承認) –
Great buy!
If you like to do some things yourself this is a must have for newer vehicles. It was a piece of cake, all the info you need is in your vehicle’s owners manual, and the tool’s instruction manual. YouTube is also an option. One tip, as with any electronics, remove the battery while you store it. You’ll need a 9volt for this tool, it is NOT included.
FEM –
Works Perfectly on 2015 Tahoe but Antenna Position Is Critical
This tool worked perfectly on my 2015 Chevy Tahoe after finding the sweet spot for the antenna. I first tried placing the end of antenna next to the top of the valve stem but it could not communicate with the TPMS. Next I tried placing the end of the antenna on the rim at the base of the valve stem…still no go. Finally, I placed the end of the antenna on the rubber tire at the edge of the rim and by the base of the valve stem…this position worked perfectly for all 4 tires (see photos). I am very satisfied with this product.
R. Graban –
Works for 2017 Volt; Must hold near tire sidewall, not wheel
Works on my 2017 Chevy Volt; however, NOTE CAREFULLY – I had already submitted a return request, thinking it didn’t work; even after following directions how to get to the tire pressure sensor (TPS) reset / match screen on the vehicle. What you need to do is hold the tool NEXT TO THE TIRE SIDEWALL near the valve stem while pressing the button while in the vehicle’s TPS learn mode. I had been holding it next to the valve stem on the aluminum wheel and it didn’t pick up. Instructions could perhaps be more clear. Very good price compared to official GM tools source – picture is identical with EL-50448 identifier, except the brand name at 3 times the price through Kent Moore.
Robert A. Dalton Sr. (承認) –
Great Product For 2007 -2013 Silverado!
Received product in good condition, and a short period of time. I purchased this programmer out of sheer frustration. I purchased new tires at my local Wal-Mart , along with a lifetime balance and rotation. What they don’t tell you at check out time is that they don’t include is a TPM relearn procedure when they rotate the tires. Both times I’ve had this done , The person behind the counter and the tire tech were not sure what I was referring to. So, this economical programmer has eased my frustration! Works great and is easy to use. The following is a step by step list to complete the TPMS relearn for Chevy/GMC trucks 2007-2013. Insert 9v battery into unit. Open truck door. Roll down drivers side window. Depress emergency brake. Insert key with fob into the ignition,and turn to accessory position.. On the Drivers Information Center press button until you come to the tire pressure monitor mode. While the key is still in the ignition,hold the lock and unlock buttons at the same time until you hear your horn blow. You are now ready to reset your TPMS. Walk to the drivers side front tire, you should notice your parking light illuminated. Point the programmer at the rubber of the tire near the valve stem, not on the valve stem. Press and release the only button on the programmer.You should see the indicator light flashing for a few seconds and then hear the horn beep once.. If all of this happens as stated, You have successfully reprogrammed the first TPM. Follow the parking lights in a clock wise rotation around your truck, following the same procedure for each tire. When you complete the last tire reprogram,you should hear two beeps of your horn. This completes the entire relearning process of the TPMS. Your done.
David J. (承認) –
Worked out of the box (added battery) 2015 Denali 2500hd
After reading many reviews this product seemed a bit of a crap shoot on whether it would work on my 2015 GMC Denali 2500HD. I am happy to say that right out of the box, with only putting a new 9 volt in it, the product worked perfectly. I shipped the tool to my work and planned on trying it when I got home (dealer rotated tires and didn’t reset the tire locations, my dealer is located 35 miles away). My manager wanted to try it immediately, so we went right out to my truck and I put my truck in the relearn mode. I was sitting in the truck and at first it didn’t do anything, I jumped out and saw that he had the antennae right on the top of the valve stem, I explained it needed to be perpendicular to the tire and put on the sidewall near the valve stem. It immediately worked. On my tires, he just swiped the antennae over an area about 4 inches (2 inches on either side of the valve stem) and it worked within seconds. To be honest, I am upset that GM made it so that unlike earlier vehicles which you could reset it yourself without any extra tool, to now needing the dealer to do it or having to go out and buy the tool, but at least with this relatively inexpensive tool, you can do it at home. I have no clue how well this tool will hold up over time, but was very happy how quickly it worked.
A. Kropp (承認) –
Works like a charm on my 2018 Colorado
This worked like a charm on my 2018 Colorado Z71. Rubber sleeve around the unit gives you a nice grip and will absorb any light bumps. On my 2018 Colorado all I did was the following: Go to the driver information center on your dash, hold the ok button down until the horn sounds. Now you’re in learn mode. Start with the driver side tire. hold it right up to the sidewall and press the button. the horn will sound once “paired” next passenger side front, passenger rear and last the drivers rear. Horn will honk a couple time to let you know it’s done. *Update April 2019 – Switched from winter to summer tire/rim set and still works like a charm. I was worried because I left the battery in the unit all winter in our unheated garage…Still worked without a problem. Will update again if I ever have any problems.
S Johnson –
2012 Chevy equinox Works perfectly!!
This device worked perfectly for me. I have a 2012 Chevy equinox. I just recently had the tires rotated and one of the tires showed a little low. I filled the indicated tire and it still showed low, so I filled some more. Then on of the other tires showed high. That??s how I knew that the TPMS was out of sync. I got this tool and 5 minuets after I got it it was all good.
Danny5 (承認) –
Rotate your own tires
I have aftermarket wheels, and I was always nervous letting mechanics that see hundreds of cars a week touch my wheels to rotate them. I’ve found scratches and marks from tire shops on my wheels, so the solution was always to do the rotating myself. But I had no way to reset the position of my TPMS sensors. I had to remember that a sensor had been moved. It’s not a big deal, and it was never worth buying a $100 tool to fix. Enter this little guy. It takes a 9v, so keep one handy. And at $15, I didn’t really have an excuse anymore. It worked perfect on my first try. Don’t point it at the valve, point it at the tire below the valve. It worked perfect on my last rotation. No more jumbled sensors makes me a happy guy.
Jon (承認) –
Gotta find that right position.
I used this for my 2015 Buick Regal. I bought a set of rims w/ tires earlier this year from a guy who had them on his Cadillac. He told me they had the TPMS sensors in them. Well when I put them on my car they did not register. I was unfamiliar with how they worked so for most of a year I dealt with the light being on and having to clear the message on my dash every time I started my car. Finally got around to doing some research and realized I needed a tool to reset the sensors. Found this one on amazon. I put in a new battery and decided to give it a try. After putting my car in learn mode I held the tool next to the valve stem and nothing. Messed with it for 5 minutes trying different positions. Ended up holding the tip of the antenna straight into the side wall of the tire near the valve stem. Once I did that it worked perfectly on all 4 sensors. Now my tire pressure shows up and best of all no damn light on the dash anymore. Totally worth the 18$
KiloTango (承認) –
Performs as described
Great, useful, low cost tool that works as advertised on GM cars (2017 GMC Canyon). Works fine if you hold it on the tire sidewall at the base of the stem as per the instructions (one reviewer was describing problems when placed above or near the valve stem itself). Allows you to reset your TPM assignments if you rotate tires yourself, or if done at a shop which doesn’t have the tool. Don’t forget to have a 9v battery which is not included.
RWSJR (承認) –
Great value, works perfectly and provides peace of mind
Most of the places I use to rotate my tires either forget to reset the sensors or assume they are reset automatically. This has led to months of having the data being reported being assigned to the wrong tire. This device worked perfectly on my 2011 Chevrolet Traverse and the reset took less than two minutes. Wish I had this device years ago! Worked perfectly. Process was extremely easy. Set the parking brake, press and hold both the lock and unlock buttons simotaneously on my key fob and the horn beeps to let me know the tire pressure monitoring system is in “learning mode.” This message also shows on the DIC. Once is learning mode, walk around the vehicle clockwise, starting with the left front tire. Point the device at the tire, even with the valve stem and press the button on the device. As each tire is synced, the vehicle’s horn beeps. Two beeps when the last tire (left rear is complete). Couldn’t have been easier!
Charlie Tuna –
Take that Government Motors!
Remember when you could relearn the tire sensors with nothing more that the DIC and a user’s manual? Well, apparently GM decided that was too much freedom for the owner of one of their vehicles so what was their solution? Make it so the dealer would have to be consulted- and quite possibly for a fee. Well, my troubles are over! I used this on a 2012 Chevrolet Traverse LTZ and following the user’s manual, the horn beeped at the appropriate times and the tires were sensing in the proper position (as tested by releasing air to see a visible change in the DIC). This may seem trivial- until you have a small non visible leak on a tire and right front is actually left rear! This was my procedure for those who want to know, and as outlined by the user’s manual starting on page 10-46. 1. Set the parking brake. 2. Turn the ignition to the ON/RUN position with the engine off (the second click before the cranking spot but one click after the acc). 3. Press the Remote Keyless Entry (your key Fob) Transmitter’s LOCK and UNLOCK simultaneously for about five seconds. The horn will beep twice to signal the receiver is in relearn mode and TIRE LEARNING ACTIVE will be displayed on the DIC. 4. Start with the driver side front tire. 5. Place the relearn tool against the tire sidewall, near the valve stem. Then press the button of your very handy dandy VXDAS EL-50448 (after you install a 9 volt battery of course) to activate the TPMS sensor. A horn beep confirms the sensor ID code has been matched to the tire and wheel position. 6. Proceed to the passenger side front tire and repeat the procedure in step 5. 7. Proceed to the passenger side rear tire and repeat the procedure in step 5. 8. Proceed to the driver side rear tire and repeat the procedure in step 5. The horn will beep two times to indicate the sensor ID code has been matched to the driver side rear tire and the TPMS sensor matching process is no longer active. The TIRE LEARNING ACTIVE message on the DIC goes off. 9. Turn the ignition to LOCK/OFF. 10. Set all four tires to the recommended air pressure levels as indicated on the Tire and Loading Information label. 11. Enjoy your liberation from the GM stealership!
Bruce Bates (承認) –
As advertised on my Buick
Just used it not 5 minutes ago and it worked perfectly for me on all 4 tires on the first time. I bought aftermarket TPMS and my service light has been on for a week getting on my nerves. I read mixed reviews, but this was cheap enough to gamble. Can’t speak for anyone else, but it’s 5 stars for me. Hopefully it will stay that way.
EJ Honda (承認) –
Worked like a charm
Had to do some interpretation of the stilted English but with the help of Google and the included directions, I was able to figure this out. Once I got the TPMS system into relearning mode, I simply started at the left front wheel, placed the antenna of this device next to the valve stem, pressed the button, and then waited for my truck to beep. Move on to the driver’s side back wheel, repeated the actions, then the passenger side back wheel, and then finished at the passenger front wheel (watch out – on my 2016 Chevy Colorado the horn must be right near that wheel well – it was LOUD). Checked my info screen in the truck and I had four tires once again reporting their pressures.
G. Davis –
Exactly as described for my Chevy
Item worked exactly as described. I had an ses light on my 2010 SS Camaro. I was a little sceptical according to various reviews. I changed a tire out and came home to check pressure in tire and went throught the set/relearn on car and nothing happened and none of my pressures would should up. I researched and found this tool and followed instructions and all four came back on. (This product uses a 9 volt battery, does not come with it) For most GM start with left front and go clockwise around car and listen for car to beep when you hit transmit on each wheel. It fixed my problem and is great for rotations and sensor blips)